


Raised Bed Vegetable Garden Design: Planning for Maximum Yield
If your yard stays soggy, windy, or salty—and your veggies keep underperforming—you don’t have a brown thumb. You just need a smarter raised bed vegetable garden design. With the right layout, materials, soil mix, and seasonal rhythm, you can warm the soil earlier, drain water faster, and harvest more—without babysitting every bed.
Below, I’ll walk you through a clean, step-by-step approach to vegetable garden bed design that’s proven on the Pacific Northwest coast (and any wet, cool, or windy microclimate).
Your 5-Step Game Plan (What to Do First)
1) Choose the right spot.
Find 6–8 hours of sun, the least windy patch, and a spot with natural runoff (or a location you can slightly crown). Avoid salt corridors and flood pockets.
2) Lock your layout ideas.
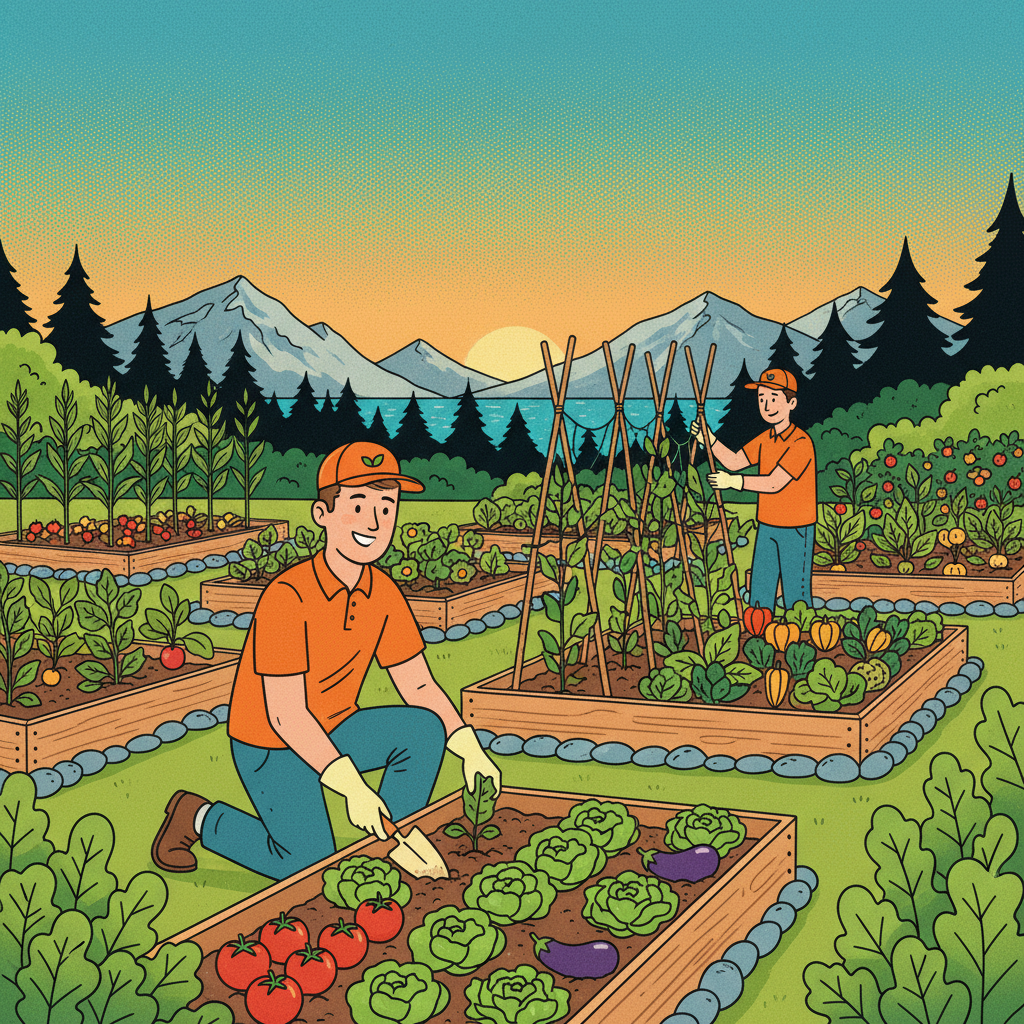
Default to 4×8 beds so every plant is within arm’s reach. Keep paths 18–24 in (or 36 in for wheelbarrows/ADA). Plan trellises on the north side so they don’t shade the rest.
3) Pick coastal-ready materials.
Cedar, composite, or galvanized steel frames with stainless fasteners last far longer in wet, salty air.
4) Build a soil profile for drainage.
Use a blend that drains within an hour (details below). Test pH and EC locally. In rainy climates, more compost isn’t always better—add coarse amendment.
5) Set a seasonal rhythm.
Drainage checks in spring, midseason feeding and pest scans, and fall cover crops/mulch. Little actions on time beat crisis fixes later.
Bonus: If you like a tidy kitchen garden aesthetic, repeat the same bed size and keep paths consistent. Symmetry makes maintenance—and crop rotation—much easier.
Step 1 — Site Assessment: Sun, Wind, Drainage, Salt
- Sun: Aim for 6–8 hours. Track morning vs. afternoon shade across seasons.
- Wind: If gusts exceed ~15–20 km/h, shelter the beds. Place beds 5–10× the height of a hedge/upwind screen for a calmer microclimate.
- Drainage: A 1–2% grade (imperceptible slope) moves surface water away.
- Salt & Flooding: Test EC where salt spray might land. Rinse foliage after storms; avoid low pockets.
Why this matters: Good siting is free yield. Warmer, calmer, better-drained beds mean stronger transplants and fewer disease problems.
Step 2 — Layout for Maximum Yield (and Less Work)
Think simple, modular raised gardens that scale as you grow.
- Bed size: 4×8 ft is the sweet spot for reach and productivity.
- Paths: 18–24 in between beds; 36 in where carts/wheelbarrows need to pass.
- Orientation: Long sides north–south for even light. Put trellises on the north edge.
- Surfaces: Gravel or compacted arborist chips = mud-free, weed-resistant paths.
- Verticals: Train peas, cucumbers, and tomatoes up; you’ll fit more food per square foot.
Smart layout ideas: mirror two 4-bed blocks with a center aisle; add a small tool shelf, hose point, and a compost bay within a few steps to keep chores quick.
Step 3 — Materials That Survive Wind & Salt
Frames
- Cedar (FSC): 10–15 yrs; beautiful and naturally rot-resistant.
- Composite boards: 15+ yrs; low maintenance, consistent.
- Galvanized steel: 10–20 yrs; top pick for coastal exposure.
Hardware
- Use stainless or hot-dip galvanized fasteners and brackets.
- Cross-brace longer beds; anchor corners if you’re in a wind corridor.
Bottoms & Barriers
- Line against critters with hardware cloth (not plastic).
- Avoid impermeable liners that trap water; your goal is drainage.
Safety & Finish
- Cap corners, round edges, and consider a perch board on one side—handy for weeding and harvesting.
Step 4 — Soil Mix & Drainage for Wet Coastal Soils
You want a fluffy, oxygen-rich mix that drains in under 60 minutes after a full soak.
Reliable recipe (by volume):
- 40–50% screened topsoil
- 30–40% mature compost
- 10–20% coarse amendment (pumice/perlite)
Targets: pH 6.2–6.8; avoid high EC. In rainy climates, increase the coarse fraction before adding more compost.
Fine-tune with local tests
- Fill a bed section, water deeply, and time how long it takes to clear.
- If water lingers (perched water), add more coarse amendment and gently fork to blend.
Amendments to consider
- Biochar (pre-charged), worm castings, and leaf mold improve structure and microbial life without bogging the mix.
Step 5 — Water & Nutrients That Match Coastal Rain
- Irrigation: ¼" inline drip at ~12" spacing; pressure regulator ~25 psi.
- Automation: Add a rain sensor—during June storms many gardens cut irrigation ~20% with no yield loss.
- Mulch: 1–2" to reduce evaporation, maintain soil temp, and block weeds.
- Fertility: Light, regular top-dressing beats big nutrient spikes in wet climates.
Step 6 — Planting & Rotation for Continuous Harvests
- Soil temps: Cool crops at 45–60°F; warm crops at 60–75°F.
- Rotation: 3–4-year cycle to reduce disease (e.g., Solanaceae → Legumes → Brassicas → Roots/Alliums).
- Stacking: Intercrop radishes or baby greens early; they’ll finish before tomatoes or squash canopy.
- Verticals: Keep tall crops to the north so they don’t shade everything else.
If you love planning, sketch two or three raised bed vegetable garden design plans and rotate them year over year.
Step 7 — Seasonal Rhythm That Prevents Problems
Spring — Drainage test, replenish mulch, check fasteners, retension trellises.
Mid-season — Light compost top-dress, pest walk-through, prune for airflow.
Fall — Pull spent crops, sow a cover crop or mulch thickly, rinse salt off frames and fasteners.
After big storms — Photo-document damage, clear debris from paths, and check bed crowns.
Small, scheduled actions keep yield high and stress low.
Troubleshooting (Fast Answers)
- Carrots spindly? Ensure 12–14" root depth and lighter texture (more perlite/pumice).
- Leaves yellowing in rain? Improve drainage and add a light, balanced feed—don’t drown the bed with compost.
- Slug pressure spiking? Copper tape + beer traps + mulch management reduce damage dramatically.
- Beds still cold in spring? Add low tunnels or black mulch to warm soil faster.
Budget, Timeline & What to DIY vs. Hire
- DIY: Small frames, mixing soil, laying drip lines, basic trellises. Two to four beds go up over a weekend.
- Hire pros: Grading and drainage, complex irrigation plumbing, long runs of steel beds, terracing on slopes, and any project near utilities or in tight access sites.
Many households find that pro-installed grading + drip saves ~6 hours/month of maintenance—and protects the beds through storms.
Eco-Smart Choices That Protect Soil & Water
- FSC cedar or recycled steel where possible
- Avoid CCA-treated wood for edibles
- Capture roof water with rain barrels
- Use low-tox primers on cuts/scratches in metal beds
- Cover crops to build soil over winter
Sample Layout Ideas You Can Copy
- Classic kitchen garden: Four 4×8 beds in a grid, center aisle, herb strip by the gate.
- Wind-ready plan: Stagger beds behind a low hedge; anchor trellises; keep taller crops to the north.
- Narrow lot: Two long ribbon beds with vertical trellises and gravel paths—neat, scalable, easy to maintain.
Each of these can be turned into printable raised bed vegetable garden design plans with crop maps and drip zones marked.
Final Thoughts
A resilient, productive garden in a rainy or coastal climate isn’t luck—it’s design. Nail the siting, keep beds to 4×8, build with coastal-ready materials, mix for fast drainage, automate watering, and follow a light seasonal rhythm. That’s the entire playbook for a high-yield raised bed garden that looks good and feeds you well.
When you’re ready to move from plan to installation, because great gardens don’t rely on luck — they rely on Dream Team Landscaping. Begin with a professionally guided site consultation and enjoy a tailored design, schedule, and warranty-backed build from day one.
READY TO TRANSFORM YOUR GARDEN?
Relates Articles
Real landscaping advice from our team—seasonal tips, project ideas, and maintenance wisdom earned over 30 years on Vancouver Island.
.png)
.png)